Extended Properties on Stereoids: Document multiple properties easily with Data Dictionary Creator
Meet Extended Properties
Microsoft introduced Extended Properties in order to document SQL Server Objects. Take a close look…there’s a plural “s” at the end. This allows great flexibility for you to come up with your own extended properties.

But there’s a downside to documenting your custom properties: It is time consuming.
You would either have to script them all…which is a bit clumsy with all this levelxtype and levelxname. Alternatively set out on a journey with clicking through a lot of property dialogues in SSMS.
Data Dictionary Creator for the rescue
An apology to my international readers….the following screenshots are in German. I hope you get the impression anyway as the software is not that complex.
It would be much easier if we could edit multiple properties for multiple columns in one grid view. Fortunately there’s a free open source program for that: Data Dictionary Creator.
Credits for that great piece of free software go to Ken Blanchard, Jon Galloway, Ben Grisworld and Tyler Ganon. However the app has been virtually dead for a long time as it uses .NET Framework 1.0 which is end of life software. Therefore I would like to send a BIG thank you to Thorsten Kansy: He updated the software to use the latest .NET Framework 4.8.1 and did quite a bit of fiddling with me until we had it up and running again. Feature-wise there’s no downside to the old version as all features still work like a charm.
Installation of Data Dictionary Creator
- Download the Release.zip at Github
- Extract it to a folder of your choice
- Run Data Dictionary Creator.exe
- There is no formal setup or installation. Simply add a shortcut to the exe file to your start menu or desktop.
Connecting to the database
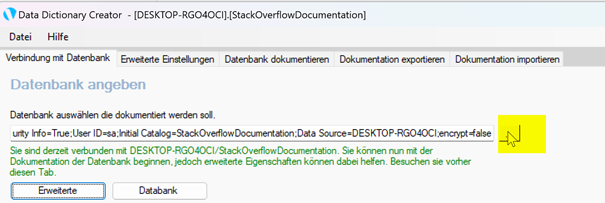
First the connection screen is shown…click here on the button with the three dots next to the connection string to connect to your SQL Server.
Then you will get a connection wizard which looks like this:
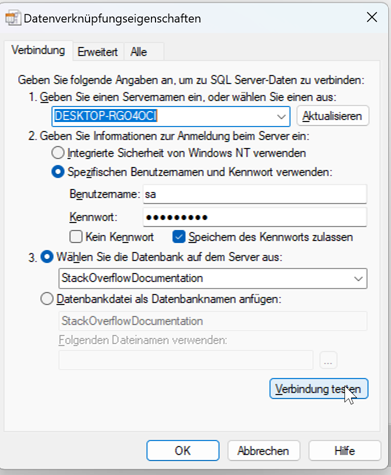
Here you can use a button to test the connection before closing it with OK.
Then look at the text below the connection string….this is either green indicating success or red indicating a connection failure.

You can now proceed by clicking on the next tab “Extended Properties”.
If you have a connection failure please click on the hyperlink-like text in the lower left of the window which will show the error message:
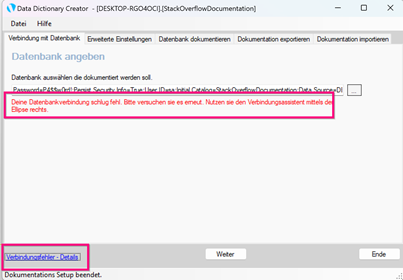
In my case it was an SSL error as I am running with a self-signed certificate for TLS encryption of the connection in SQL Server on Docker. The solution for that issue is to add ;trustServerCertificate=true (trust the self-signed certificate) or ;encrypt=false (use no TLS encryption) to the end of the connection string.
Configure extended properties
In this tab you can set up the additional Extended Properties you would like to document. This is done in the bottom of the page. You have to name the properties in a comma separated list.
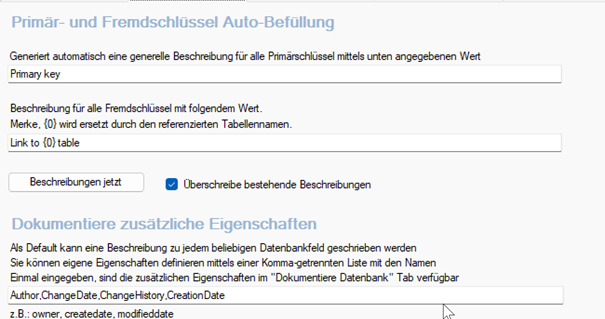
The upper half of the page can also be useful: You are able to set all primary and foreign keys with a generic description. In order to do that you have to click on the button “Document now” (in the screenshot “Beschreibungen jetzt”). Additionally you can set a check box if you like to replace existing descriptions for that columns (checkbox activated) or not. Now change to the next and IMHO central tab to document the database.
Have fun and document like a pro
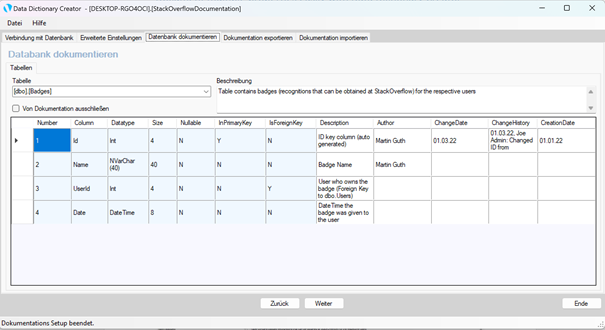
The previous two tabs are related to initial setup work. The upside is that this is information you will not have to revisit that often. If you open Data Dictionary Creator the next time you will be able to directly start documenting. This is what the tab “Document database” is all about.
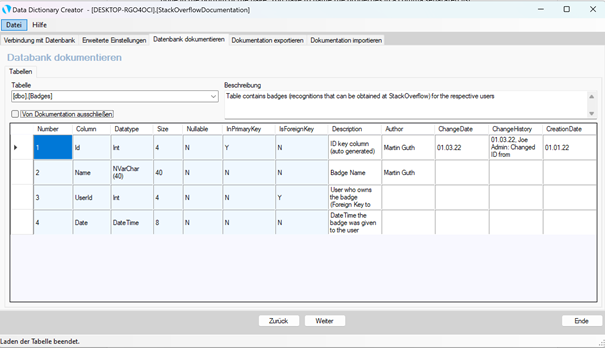
You have a drop down list for tables. The text field right to the table name contains the MS_Description for the table itself.
Underneath the nice grid is shown with information about all columns and the properties you chose to edit. Now simply start typing into these columns and be happy to be spared all the clicking or coding in SSMS 😉.
There is a checkbox in between the table drop down and the column documation grid “Exclude from documentation”. This relates to the next tab “Export documentation”.
Export and import documentation
The next two tabs are related to exporting the documentation and importing it again.
The following file types are supported: Excel, Word, HTML, XML, TSQL.
XML and TSQL can then be used to import the documentation from.
I personally prefer the interactive website created by SchemaSpy. There you also have the ability to export to Excel or PDF if necessary. You can look at a sample output and read about the setup here and here .
Happy documenting!